Examples :
- `/etc/mail/virtusertable:`
sales@johndoe.com -> Sales@johndoe.com
Sendmail is not case-sensitive so it sees these as the same alias
- `
/etc/mail/virtusertable`
sales@johndoe.com -> sales
when sales is an actual e-mail address in `/etc/passwd`
AIT’s Linux environment views the alias files after checking the passwd file so each time a request is sent to a user in the passwd file another request is then sent to the alias file (virtusertable) and thus the loop begins.
]]>Viewing Aliases through SMT
- Login to the SMT interface
- Follow this FAQ: How Do I Set-Up an Email Alias in SMT6?
- Be sure to change the postmaster alias to something you will check frequently.
Viewing Aliases through FTP
- FTP to your server.
- Proceed to the /etc/ directory.
- Open the aliases file. Find the entries like this:
- To receive these mails in the root or postmaster mailboxes, change the ‘root’ user to an email address that is valid that you check.
- Then add and remove an alias through the SMT interface. This will rehash the aliases file, and make it a binary file for sendmail to read again.
- You can then remove all of the Bogus.root and root files in the /var/spool/mail directory.
To create an Alias:
- Access your SMT 5.0
- Navigate to, “Mail Services > Add > Setup Email Forwarding.”
- Enter a username into “Alias Name“
- Select the intended domain for the forwarding account.
- Select an existing POP3 account or enter an external mail account to designate the forwarding destination.
- Click, “Add New Alias” to secure forwarding from “Alias Name” to “Alias To.”
To delete an Alias:
- Access your SMT 5.0
- Navigate to, “Mail Services > Manage > Manage Email Forwarding > View Aliases.”
- Select the alias domain and click, “View Aliases“
- Click the username of the forwarding account (alias) to remove it.
For Windows Fully Managed Plans (only):
To create an Alias:
To setup email forwarding you will need to follow these simple steps.
- Log into your Online Imail Interface by going to //yourdomain.com:8383or //mail.yourdomain.com:8383
- Locate the pull down menu that says either Administrative Account Options
- Within that menu go to Alias Administration
- Choose ADD, fill in the necessary information
- Click Save
You have now setup this particular email account up for Email Forwarding.
To delete an Alias:
- Log into your Online Imaill Interface by going to //yourdomain.com:8383or //mail.yourdomain.com:8383
- Locate the pull down menu that says either Administrative AccountOptions
- Within that menu go to Alias Administration
- Choose the email alias from the drop-down menu you wish to delete.
- Choose Delete
Your computer’s IP or firewall’s IP address could be blocked by the server. This happens when someone from the above mentioned IP addresses attempts to access unauthorized ports by means of scanning or attempting to gain root-level access. When this happens the offending ip address is blocked in our managed firewall services. If you believe this is the case do the following:
1. Attempt to access your domain from the computer in question. Note any messages.
2. Attempt to access your domain from a machine with a different IP address (preferrably off the network).
If you’re unable to access the site from within your network but can access it
outside chances are that ip address is blocked by the server. Obtain your IP addresses that can not access the server at AIT (you can use services such as whatismyip.com to determine your IP address) and provide that to AIT via a trouble ticket.
]]>From user@hotmail.com Wed Oct 2 07:51:54 2002 (Not Important – email address easily forged)
Return-Path: user@hotmail.com(Return path – not important – easily forged)
Received: from hotmail.com (oe55.law14.hotmail.com ) (Received from the server at hotmail.com, with an IP address of 64.4.20.63. While the server name can be easily forged, the IP address is NOT)
by domain.com (8.8.8/8.8.5) with ESMTP id HAA29403(The domain which received it)
for ; Wed, 2 Oct 2002 07:51:53 -0400(The email address it was intended for)
Received: from mail pickup service by hotmail.com with Microsoft SMTPSVC;(More verification it was sent through hotmail servers)
date: Wed, 2 Oct 2002 04:51:23 -0700(Date/Time sent)
X-Originating-IP: (IP address of the originating SERVER)
From: "betty w." user@hotmail.com(Again, easily forged)
To: "Person's name"
Subject: Re: IF YOU GO LAST MESSAGE
Date: Wed, 2 Oct 2002 07:45:53 -0700
MIME-Version: 1.0
X-Mailer: MSN Explorer 7.02.0005.2201
Content-Type: multipart/alternative; boundary="----=_NextPart_001_0001_01C269E7.BC0066E0"
Message-ID:
X-OriginalArrivalTime: 02 Oct 2002 11:51:23.0060 (UTC) FILETIME=
So what does this tell us? It tells us that a user, whose IP address is 64.4.20.63, at hotmail sent an email to the customer.
What it does not tell us for sure is if the user is actually user@hotmail.com. Often the usernames are forged.
Need additional help? Use the header analyze features on this site.
]]>When setting up your e-mail program(s), the following settings will most likely be used when configuring the program.
Incoming (POP3) Server:
yourdomain.com (NOTE: DO NOT put ‘www’ or ‘pop’, etc. in front of the domain!)
Outgoing (SMTP) Server:
yourdomain.com (NOTE: DO NOT put ‘www’ or ‘smtp’, etc. in front of the domain! The exception is with all Fully Managed Windows Servers, excluding the Business/Reseller III, you will need to use mail.yourdomain.com)**Some Internet Access Providers require you to use their SMTP server.
POP3 account/user name:
Fully Managed Linux – youraccountname / Fully Managed Windows – youraccountname@yourdomain.com (This would be the name of the email account you created)
POP3 account/user password:
This is the password for the POP email account that you have created.
Below is how to configure some of the popular client side email applications.
Netscape Mail
Open Netscape Browser
Go to Options menu bar and choose Mail and News
- Preferences
- Choose the Servers tab:
- Outgoing SMTP should be the mail server address of your dial-up company
- Incoming POP server should be yourdomain.xxx (substitute your domain name)
- POP3 username is the account you set up in your IMail Administration PageClick the Identity tab:
- Enter your name
- Enter your full e-mail address
- Enter your reply e-mail address
- Click Apply
Microsoft Office Outlook
- Open Microsoft Office Outlook
- .

- From the File menu, choose Add Accounts….

- Select the Manually configure server settings button, and click Next …

- Choose the Internet Email button.

- Fill your information as follows…

- On the right hand side, choose More settings…

- Click the My outgoing server (SMTP) requires authentication…and make sure the Use same settings as my incoming mail server is selected.
Outlook Express
- Open Outlook Express.

- If the Internet Connection Wizardpops up, skip to step #5. Otherwise go on to step #3.
- From the Tools menu, choose Accounts.

- Click the Add button, and choose Mail.

- In the Display name box, type in your name, and click the Next > button.

- Select I already have an e-mail address that I’d like to use. (You may not have to do this)
- In the E-mail address box, type in your email address, and click the Next > button.

- Click the down arrow on the drop-down list and choose POP3.
- In the Incoming mail (POP3,IMAP or HTTP) serverbox, type ‘yourdomain.com’.
- In the Outgoing mail (SMTP) serverbox, type ‘yourdomain.com’.
- Click the Next button.

- In the Account namebox, type in your email address.
- In the Passwordbox, type in your password.
- Check the box next to Remember passwordif you would like your password to be saved.
- Click the Next > button.

- Click the Finish button.

- Click the Close button.

Netscape Communicator Mail
- Open Netscape Communicator
- Go to Edit menu and choose Preferences
- Click on Mail and Groups and the + sign adjacent to it
- Click on Identity and enter your name and mail address
- Click on Mail Server and enter the following:
- Incoming POP should be yourdomain.xxx (substitute your domain name)
- Outgoing SMTP should be the mail server of your dial-up company
- Choose the POP3 radio button under Mail Server Type
- Click OK
Zimbra is an easy to use piece of unified collaboration software, specifically focused on email and file sharing. Being one of the best free, open source collaboration software available, Zimbra includes email, calendaring, file sharing, activity streams, social communities and more. Zimbra comes in two different forms: a free open source edition and a paid version.
Installing Zimbra Collaboration Open Source Editiions
Zimbra runs on several different distributions of Linux, but in this FAQ, we will be specifically installing it on CentOS 6. Please ensure that you select the proper dedicated server or cloud server that fits the requirements of the software. The system requirements are:
- A CPU of 1.5GHz or better.
- 4GB of memory/RAM or better.
- 5GB free space for software and logs.
- Additional disk space for mail storage (recommended 100GB or more).
When giving your cloud or dedicated server a hostname, you’ll need to include a full FQDN (i.e. mail.yourdomain.com), including the domain and tld. Next, login via SSH with PuTTY.
Update the Operating System
yum update –y
Install Pre-requisites
yum install -y gmp libidn wget nano make nc sudo sysstat libtool-ltdl glibc perl ntp libaio
Disable postfix If Operational
service postfix status
If postfix is running, we’ll need to disable it:service postfix stop && chkconfig postfix off
Setup and Configure DNS
Zimbra includes a mail server system, which requires a FQDN (Fully Qualified Domain Name), meaning that we must configure the DNS for our domain name for use in Zimbra. There’s a few different ways of achieving this.
The easiest method is to use the AIT’s DNS management option in the “Domain Registration” tab of the My Account interface. More on that is listed here.
Alternatively, you can add the A and MX records to your own DNS server that you may have in another location. But be aware, this can cause your installation to fail if not done properly.
Download Zimbra Open Source Software
Proceed here. Download the software that is needed for your operating system and version you specify.mkdir zcsinstallcd zcsinstall
wget (url to the software you selected above)
Example:wget `http://files2.zimbra.com/downloads/8.5.0_GA/zcs-8.5.0_GA_3042.RHEL6_64.20140828192005.tgz`
/etc/hosts File Updates
The Zimbra installer is very particular about DNS and local names in the /etc/hosts file. Thus, you may need to update your /etc/hosts to reflect the information it’s looking for.vim /etc/hosts
You will see something like this. Add the bottom line with the proper IP address, hostname and local alias.127.0.0.1 localhost localhost.localdomain
::1 localhost ip6-localhost ip6-loopback
216.117.191.100 mail.example.com mail
Unpacking And Installing Zimbra
tar zxvf zcs-*.tgz
Change directory into the folder that the files were extracted into:cd zcs-*
Finally, begin the software installation process../install.sh –platform-override
You will be prompted about the license. Click “Y” at each license prompt. When you reach the “select packages to install” section, simply press enter at each of the options which will select the default value.
You may get the following error during installation:
DNS ERROR resolving MX for mail.example.com
It is suggested that the domain name have an MX record configured in DNS
Change domain name? No
If you get a port conflict error, you may need to exit the installer and resolve the issue before continuing.
Set Admin password
This main menu will appear when all the pre-requisite checks are done. Select the option number for the zimbra-store, which shows the Admin password field as UNSET.Main menu
1) Common Configuration:
2) zimbra-ldap: Enabled
3) zimbra-logger: Enabled
4) zimbra-mta: Enabled
5) zimbra-dnscache: Enabled
6) zimbra-snmp: Enabled
7) zimbra-store: Enabled
+Create Admin User: yes
+Admin user to create: admin@mail.example.com
******* +Admin Password UNSET
+Anti-virus quarantine user: virus-quarantine.4wxbcdanc2@mail.example.com
+Enable automated spam training: yes
+Spam training user: spam.lf5atsuxy@mail.example.com
+Non-spam(Ham) training user: ham.swfxf0szl@mail.example.com
+SMTP host: zimbrademo.website-dev.ait.tools
+Web server HTTP port: 8080
+Web server HTTPS port: 8443
+Web server mode: https
+IMAP server port: 7143
+IMAP server SSL port: 7993
+POP server port: 7110
+POP server SSL port: 7995
+Use spell check server: yes
+Spell server URL: http://mail.example.com:7780/aspell.php
+Enable version update checks: TRUE
+Enable version update notifications: TRUE
+Version update notification email: admin@mail.example.com
+Version update source email: admin@mail.example.com
+Install mailstore (service webapp): yes
+Install UI (zimbra,zimbraAdmin webapps): yes
8) zimbra-spell: Enabled
9) zimbra-proxy: Enabled
10) Default Class of Service Configuration:
s) Save config to file
x) Expand menu
q) Quit
Address unconfigured (**) items (? – help)
Select, or ‘r’ for previous menu 7Create admin user: admin@mail.example.com
Password for admin@mail.example.com (min 6 characters):
Set Time Zone
Next, set the time zone for the installation. Go back to the main menu and select 1 for the Common Configuration.Select, or ‘r’ for previous menu r
Then, choose 1 to go to the common configuration section.
*** CONFIGURATION COMPLETE – press ‘a’ to apply
Select from menu, or press ‘a’ to apply config (? – help) 1
After this, choose 6 to edit the time zone.
Select, or ‘r’ for previous menu 6
Here, you should choose the number relative to the time zone you’re in. For example, you could type 26 to get the America/New_York time zone.Enter the number for the local timezone: 26
Finalize Installation
Once complete, the installation will apply everything you’ve entered, download the needed packages and install them. You will be asked if it is ok to save the configuration data and to modify the system. The default on the save configuration is yes, but the default on the modify system is no. Thus, you must type Yes to proceed.
Select, or ‘r’ for previous menu r
*** CONFIGURATION COMPLETE – press ‘a’ to apply
Select from menu, or press ‘a’ to apply config (? – help) a
Save configuration data to a file? yes
Save config in file: /root/zimbra-installation.txt
Saving config in /root/zimbra-installation.txt…done.
The system will be modified – continue? yes
Lastly, reboot your dedicated or cloud server to ensure all services are deactivated that need to be, and the ones that need to start will start on boot up.
The Zimbra Admin Control Panel
The admin interface can be accessed by visiting something like: `https://mail.example.com:7071/`
Note that this is “https” not standard “http” and also the port number of 7071, which could have been changed during installation, but is the default.
]]>Note that when you submit a trace route to AIT, we will review the entire trace route and specifically we will look for the mid-point or half way point between your connection and AIT’s network. There is normally a handoff between one major carrier and another major carrier that AIT may use. For example, if you perform a trace route, and you get 2 major networks, the place where it goes from one network to another is the mid-point. If there is a problem on AIT’s side of the mid-point, AIT will contact our carrier(s) that can help address the issue you may be having. However, if you see problems, time outs or any *’s before the mid-point, then it is best to contact your internet service provider and have them determine why that is occurring because they own relationships with the carrier(s) that are timing out.
If you are having intermittent problems accessing your dedicated server or web hosting account, please run a trace route as follows:
- If you have a Windows XP, Windows Vista, or Windows 7 PC:
- Click start icon, then in the search box, or in the ‘run’ option, type ‘cmd’.
- This opens a DOS prompt.
- At the DOS command line, type tracert yourdomain.com where yourdomain.com is your domain name.
- Your screen may output information that looks like:Tracing route to example.com over a maximum of 30 hops:1 – 123 ms – 123 ms -123 ms – 38.1.1.1
- 2 – 147 ms – 145 ms -182 ms – fayetteville.nc.pop.psi.net
- 3 – 170 ms – 134 ms -134 ms – 207.124.104.544 – 123 ms – 123 ms -123 ms – example.com
- You can copy and paste the results into a trouble ticket as needed.
- If you have an Apple device, such as an iMac, MacBook Pro, etc:
- Open a terminal window.
- Type the following at the prompt. Replace ‘domain.com’ with your domain name.
>traceroute domain.com If you cannot open a terminal window, you can do the following instead:- Open the Applications folder.
- Open the Utilities folder.
- Choose Network Utility.
- Click on the Traceroute tab and enter in the domain you want to query.
Email Addresses:
When creating usernames for your email accounts, the username should be created in all lowercase letters. When the username is created in this manner, the recipient will receive the email despite the capitalization of the username. However, even if you do create it with UPPERCASE letters it will not matter anyway. It is just good practice to keep it lowercase. Passwords are case sensative. Make sure you clearly document your passwords as this will affect the users ability to login. If not entered exactly as it was created, access will be denied.
For example, if the username is created as mymail@domain.com, then the recipient can receive email if the email address is entered as MyMail@domain.com, Mymail@domain.com, mymail@domain.com or any other deviation of the letter format.
Password:
Passwords are case sensitive. If you create a password with the password of “REST”, then the entering the password of “rest” in your email client/program, will result in an error.
]]>Note: The screenshots and information below are for iOS7 and iOS8
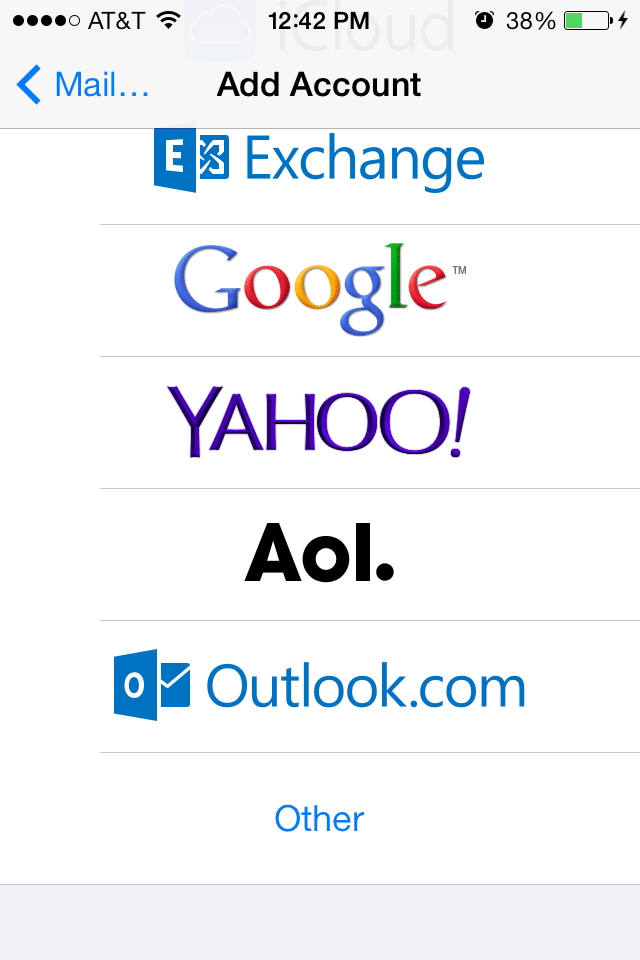
Step1: Navigate to your Settings on your iPhone and select Mail. Select Add Account.
Step2: In the Add Account screen select Other.
Step3: Enter the information associated with the email account you wish to add.
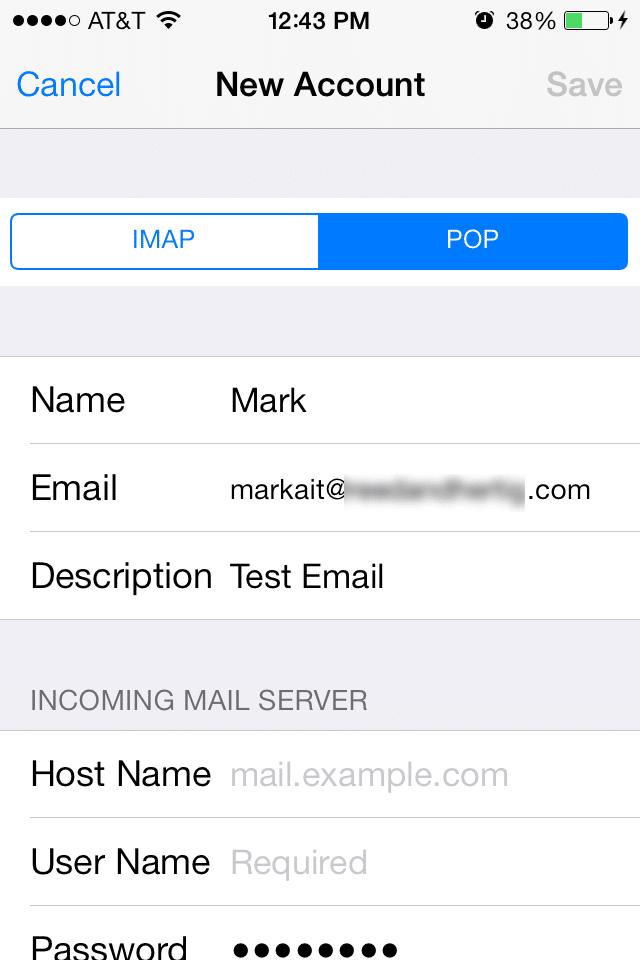
Step4: In the New Account section your iPhone will automatically try to set this up as a IMAP account but you will need to set this up as POP by selecting POP in the menu screen. You should not have to reenter your information.
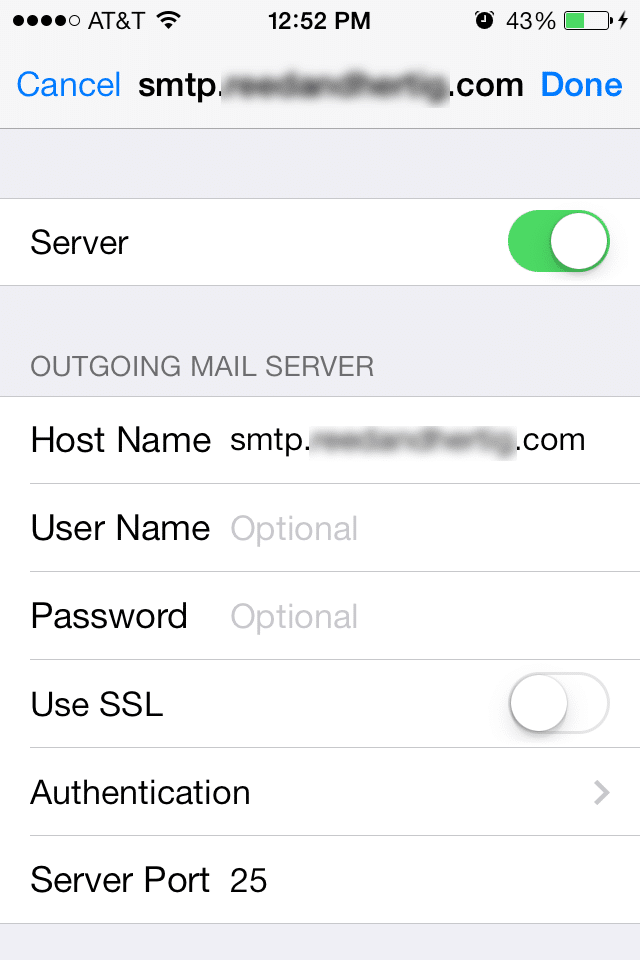
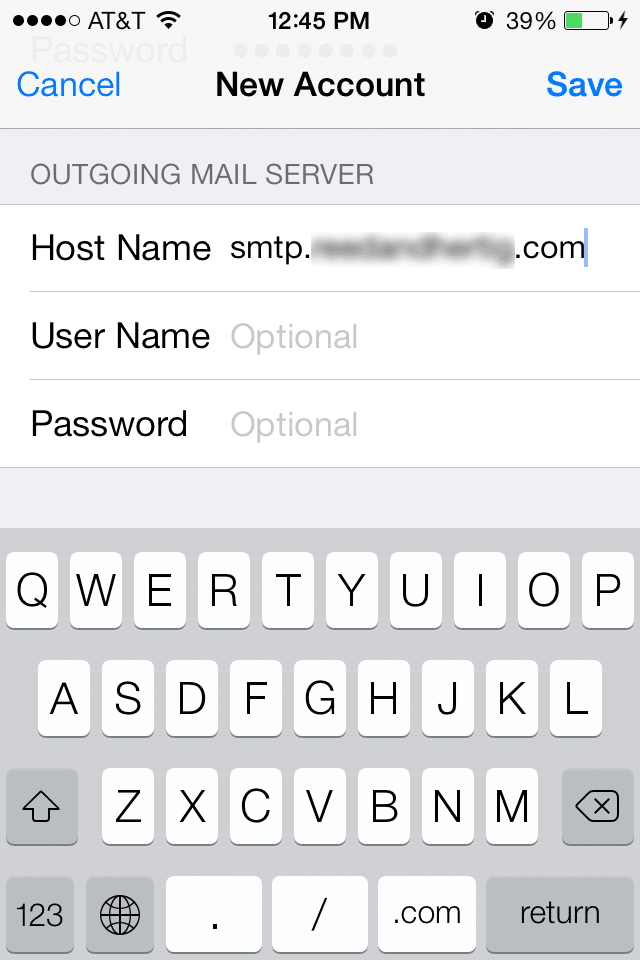
DO NOT enter your username and password for Outgoing Mail Server, your host name will be the domain associated with your email account with smtp. in front of it.
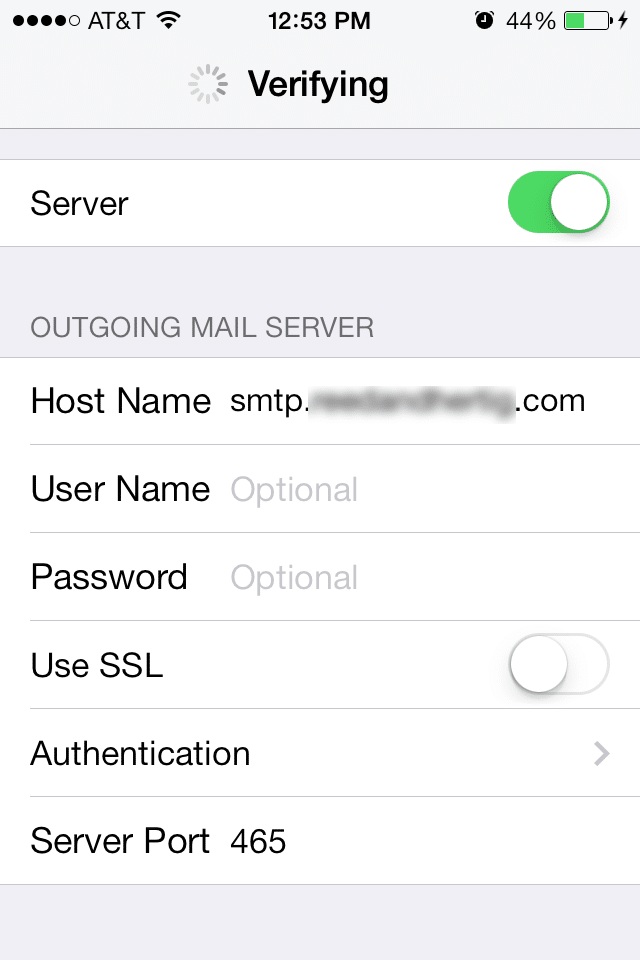
Step5: You will see a screen that will prompt you to attempt to connect without SSL, select Yes.
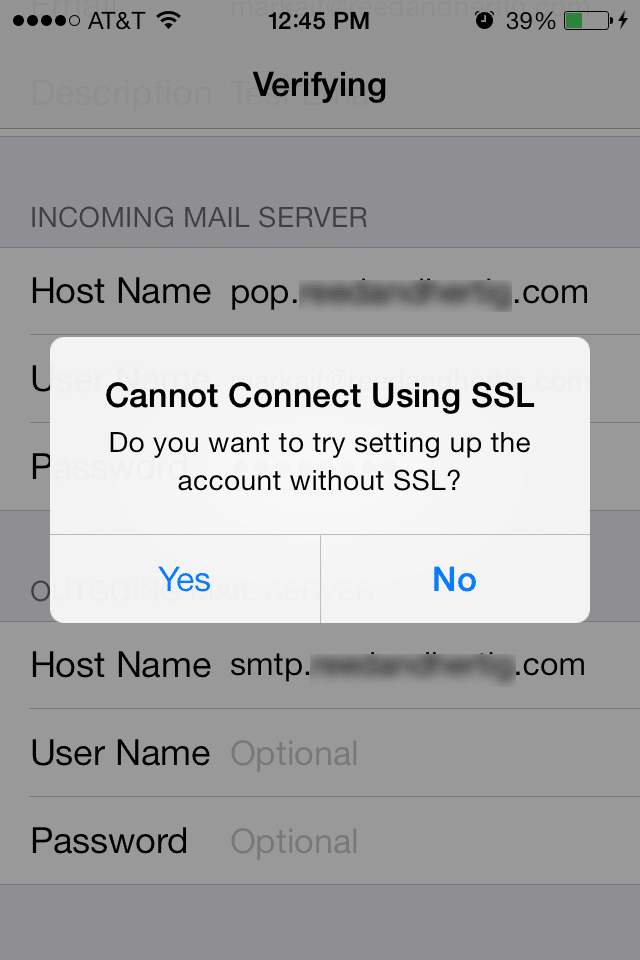
Step 6: The SSL prompt it will ask twice, and the verification process takes about 3 to 5 minutes
Once it has verified the email account it will go through a checklist and then revert back to email Account Screen.
The new email account you have added will appear in the list.
The Default Outgoing Port for SMTP is Port 25. If you require a different Port to be used you will need to click on the email account, and select the Outgoing SMTP Server.

Step7: Click on the On option for the selected email account.
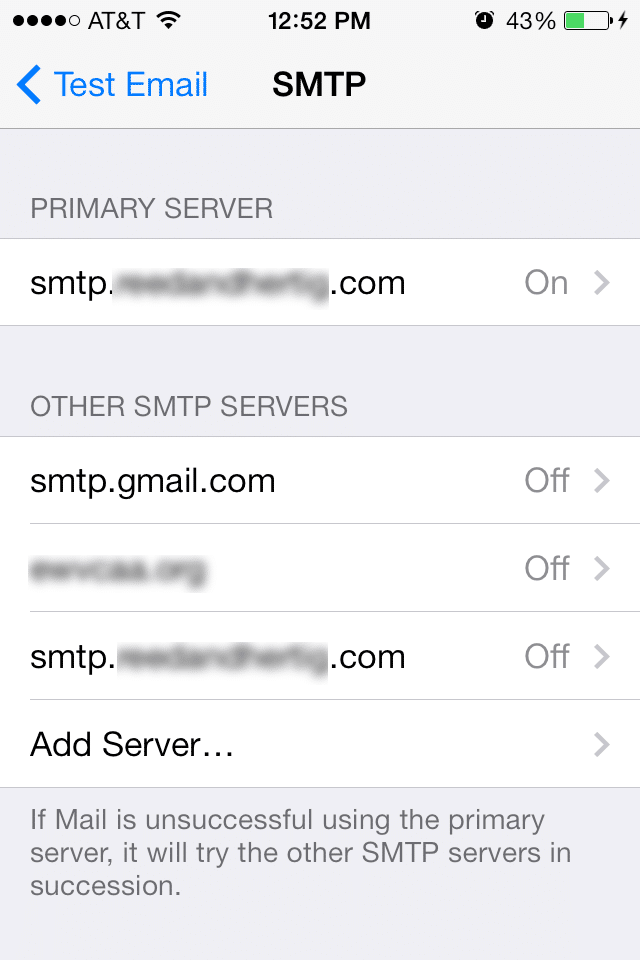
Step8: On the screen below if you need to change the Port setting you will enter the number of the Port below. Once you have your iPhone will need to verify the Port change. Once it has verified the change, you are done.