This feature will add a ScriptAlias to your srm.conf or httpd.conf configuration file, and create the cgi-bin directory under /www/htdocs/virtualhostname/
To add a cgi-bin for a virtual host, follow the instructions below:
- Log in to the SMT interface, then Web Accounts. Then select the Actions button under the virtual host in question.
- Click SOFTWARE/SERVICES, then CGI.
- Then select Start CGI Installation.
- Follow the wizard’s steps through the creation of the CGI directory.
- Click on the submit button and your done.
When virtual host calls the script they have placed in their cgi-bin directory, they will need to call it using the following:
/*virtualdirectory*cgi/scriptname.pl
** Replace *virtualdirectory* with the virtual host directory name on the server.
Linux Fully Managed Account on SMT 5.0
This feature will add a ScriptAlias to your srm.conf or httpd.conf configuration file, and create the cgi-bin directory under /www/htdocs/virtualhostname/
To add a cgi-bin for a virtual host, follow the instructions below:
- Log in to the cpanel and choose Web Services from the left hand side of the screen.
- Then select Install CGI-BIN for Virtual Host from the list of option on the screen.
- Click on Display list and choose your virtual host from the list.
- Click on the submit button and your done.
When virtual host calls the script they have placed in their cgi-bin directory, they will need to call it using the following:
/*virtualdirectory*cgi/scriptname.pl
** Replace *virtualdirectory* with the virtual host directory name on the server.
Windows
A cgi-bin directory is not completely necessary on a Windows environment, however if you wish to create one follow the instructions below.
- Log into the SMT / cpanel as webadmin.
- Click on Add under Web Services.
- Click on ‘Password Protected Directories’.
- Click on the domain name where you want to add the directory.
- If its the main account, make sure you click the www entry and not the ftp.
- Press the “Add Virtual Directory” button.
- Select the Physical Path www*.* directory and press the ‘Expand’ button.
- Type the Alias for Virtual Directory (eg: cgi-bin)
- Allow Anonymous: Yes
- Select the “Execute” permissions from the “Access Permissions” section
- Click the “Add Virtual Directory” button.
You have now created a cgi-bin directory on your Windows server.
]]>Q: What is SMT 6.0?
A: SMT 6.0 (Server Management Tool version 6.0) is AIT’s new control panel for fully managed web hosting accounts. SMT 6.0 features many new features, including 1 Click Installs for the latest Applications like WordPress, Joomla and OpenCart, improved Account Management, including a Virtual Host control panels with features that you can select, a Large Open Source Application Library, Over 20 Applications, with more to come, 1 Click Database Creation and simple to use Database Management, and New Webmail UI and Updated Features and improved Email Management.
Q: How do I get SMT 6.0?
A: AIT will be deploying SMT 6.0 to all Fully Managed Linux customers running the CentOS image over the next 30 to 45 days. The deployment is scheduled to only take about 10 minutes per account, and will not impact your hosting or email service. If you would like SMT 6.0 now, rather than waiting on a deployment, you can request it through the trouble ticket system.
In the meantime, you can demo SMT 6.0 through the SMT 6.0 Demo system by loggin into the interface below.
URL: http://cpanel.hostwithwebsite-dev.ait.tools/
username: smt6demoadmin
password: SMT6demo2012
Q: How do I access SMT 6.0?
A: There are 3 ways to access SMT 6.0. We’ve done this so that customers that use different features have a number of ways to get into their SMT interface.
- You can login to the Single Sign On System at https://sso.website-dev.ait.tools, then select your Web Hosting account, then select “Manage Server SMT 6.0”.
- You can login to the Online Customer Care Center at https://website-dev.ait.tools or https://order.aitcom.net with your customer number and password, then select “Manage Server SMT 6.0”.
- You can proceed to http://cpanel.yourdomain.com where ‘yourdomain.com’ is your domain name. Upon resolution of the site, you will create an account, and login with that account.
Q: Is there a User Manual?
A: Yes, SMT 6 has a User Manual in our support site.
Q: How do I provide feedback on SMT 6.0?
A: AIT has launched a 60 day beta test for SMT 6.0 and the beta team is still receiving feedback. Some of this feedback will be included in the update to SMT 6.0, which will be launched in Q4 of 2012 or Q1 of 2013. If you have feedback from your use of SMT 6.0, you can email smt6beta@website-dev.ait.tools and the entire team will receive your feedback. Please note that this is not a support address, but merely a beta test team that can review features, or modifications to SMT 6.0 for future release. As such, this team is not available 24×7. Alternatively, you can submit any error messages to our 24×7 support team through the Trouble Ticket System.
Q: Are there any videos about the SMT 6.0?
A: Yes, videos for the SMT 6.0 features and a “Getting Started” video are below.
]]>- Proceed to http://website-dev.ait.tools and click the “My Account” button. Login with your customer number, or email address and password, and then click the “Manage SMT” button next to the plan that has the domain for the SMT 6 control panel you would like to manage.
- You can access the site via cpanel.yourdomain.com:20000, where yourdomain.com is the domain you registered when signing up for your account. Login with the username and password you created the first time.
If you have forgotten your username or password, visit cpanel.yourdomain.com.
Forgotten Password
From the main login screen, click on the tab labeled “Forgot Password?” Enter your username and then click Recover Password. This will send your password to the email associated on your account. If you do not have access to that email account, please contact AIT support to confirm ownership of your account.
Forgotten Username
From the main login screen, click on the tab labeled “Forgot Username?” Enter the email address associated with your account and then click Recover Username. This will send you the username via email. If you do not have access to that email account, please contact AIT support to confirm ownership of your account.
]]>The WMT is where you will make most of the changes to your hosted accounts, from setting up email and ftp accounts to managing 1-Click Installation Applications.
Accessing the WMT is simple:
- First, click on the Web Accounts Icon in the Main Panel of SMT6.
- Then, click on Website Manager. Here you will see a list of all the domains associated with your account, their contact information, and the icon that will allow you to access the WMT.
- Finally, click on the Icon under Actions for the domain you wish to access. This will open the Website Management Tool for that domain.

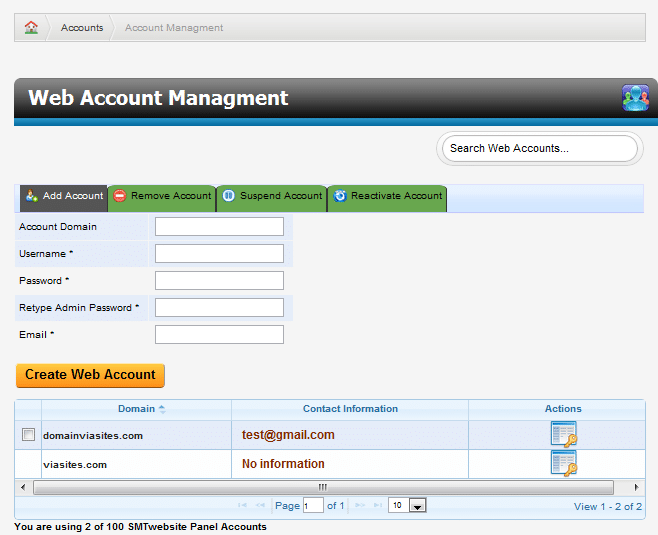
Resellers will find that our new Web Accounts Manager allows them to set up virtual hosts for their customers with their very own SMT control panel in just a few clicks.
To access the web accounts manager, first click on Web Accounts from the main SMT panel and then click Website Manager. From here, you can add, remove, suspend, or reactive accounts with just one click.
Adding New Accounts
From the Web Accounts Manager (Figure 2.6) click on the Add Account tab. From here, enter the domain, username, password, and email for the new account you would like to add, and then click Create Web Account.
Adding Virtual Host
Want to add virtual host and manage them under one control panel? Then take the following steps:
1. Log into your control panel.
2. Click “Web Accounts”.
3. Click “Website Manager”.
4. Click the “Actions” Icon for the domain that you would like to add the virtual host to.
5. Click “Domains”.
6. Click “Domains” again.
7. Click “Add Domain”.
8. Add the domain name in the “Domain *” Field
9. You can leave the directory field blank as it will auto-fill with the correct information.
10. Click on “Create Domain”
]]>FTP & File Management
Access FTP Management from the SMT by clicking on “Web Accounts”, then “Website Manager”, then the “Actions” icon on the right, then click “Files/FTP”. From here you can create and edit FTP users, use our web based file manager, create password protected directories, or check your web disk usage.
To access the SMT: From within your account, click the ‘Hosting Management’ tab, then click the blue “Manage SMT” button on the right side of your domain name.
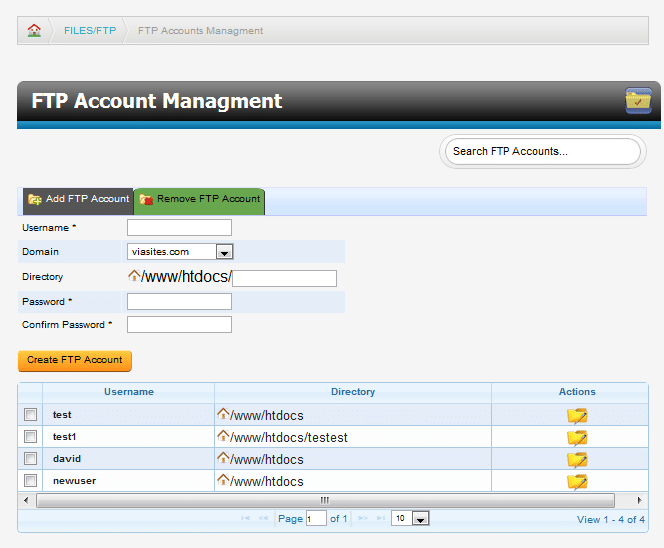
Creating FTP Accounts
To create a FTP User, click Add FTP Account. This will bring up the account creation screen (See Image Below). Choose your username, the domain they will have access to, the directory they will access when logging in (leave blank to give the account access to the root directory), and a password. Once you have entered all of this information, click Create FTP Account.
Modifying FTP Accounts
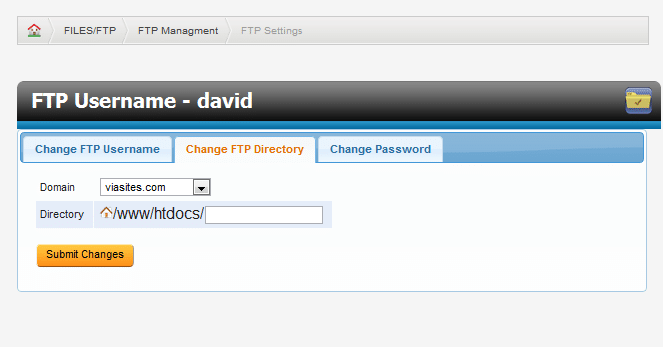
To change the username, password, or home directory for an FTP account, select the checkbox next to the account you wish to modify. From this screen (See Image Below), you can choose the appropriate tab for the account information you wish to modify.
Deleting an FTP Account
To delete a FTP account, select the checkbox next to the username you wish to delete, and click Remove FTP Account. Confirm the action on the next screen to delete the account.
Online File Manager
To access the Online File Manager, select Files/FTP from the main WMT panel and then select File Manager.
AIT’s Online File Manager is built on the open source application, “AjaXplorer.” AjaXplorer’s 4.0.4 User Manual is located here: https://website-dev.ait.tools/user-manuals/
Of course, you may use third-party software for your FTP accounts as an alternative to AIT’s Online File Manager. The following guide describes our recommended FTP clients:
Adding Mail Accounts
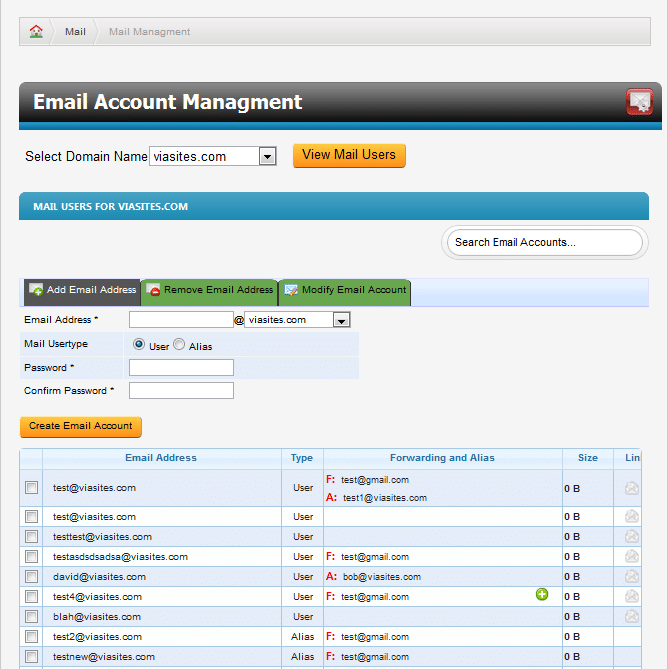
To add a new email account, do the following:- Click Add Email Address. This will bring up the drop down shown in the figure below.
- From here, enter the username, select your domain, and choose a password.
- Click Create Email Account to complete the process.
- Select Alias for the Mail User type
- Then the account you wish to receive the mail for this alias.
Deleting Mail Accounts
To delete an email account, select the box next to the mail account you wish to delete in the, “Email Account Management” section and click, “delete.” This will bring up a confirmation prompt. If you are sure you wish to delete the account then click, “confirm.”Accessing Webmail and Configuring Mail Accounts in an Email Client
The two icons to the right of each mail user are used to access Webmail and display the correct settings for an email client such as Outlook or K-9 Mail. Webmail can also be accessed at the following URL: yourdomainname.com/webmail/
Advanced Email Functions
To access the advanced email functions for an email account, check the box next to the mail account you wish to modify, and click Modify Email Account. This will bring you to the Email Settings page.Changing Username/Email Address
When modifying an email account, the first option will be to change the username of the account. This will change the email address for that account.Changing Password
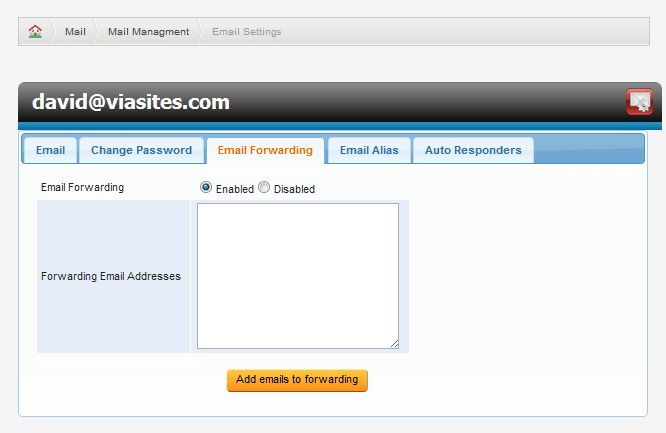
Select, “Change Password” from the “Email Settings” page to change an email account’s password. For information on Mail Forwarding, please visit: http://website-dev.ait.tools/blog/how-do-i-setup-email-forwarding-in-smt6/ For information on Alias Setup, please visit: http://website-dev.ait.tools/blog/how-do-i-set-up-an-email-alias-in-smt6/ For information on Auto-Responders, please visit: http://website-dev.ait.tools/blog/how-do-i-set-up-email-auto-responders-in-smt6/Email Forwarding (single and mail lists)
To begin, first click the Email Forwarding Tab from the Email Settings page. From here, choose whether forwarding is enabled or disabled. Enter the email address you would like the email for this account to be forwarded to. Use a comma (,) to forward to multiple email addresses, or list each email address on a single line. Select the ‘Add emails to forwarding’ button to confirm your changes. This feature combines previous SMT options for email forwarding to a single email account, and Mail List options.